
How to Remove the NavigationLink Chevron From a List in SwiftUI
Let me present two examples on how to achieve it

Hello SwiftUI Learners,
Welcome back to another issue of Learning SwiftUI. I am gonna try to be more active again so I will start off in a chill way by giving you two small tips of how you can remove the chevron from a list view when you use a navigation link.
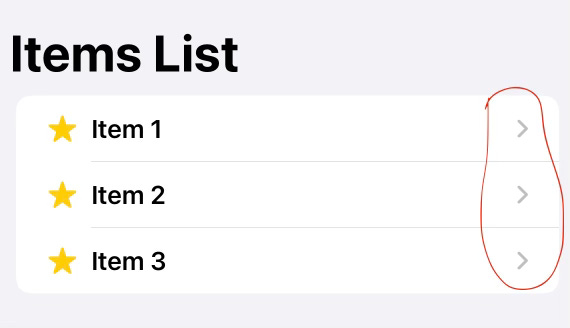
This is what we will learn to remove:
What is a Navigation Link?
NavigationLink is a SwiftUI component that allows you to navigate from one view to another. When used within a list, it enables the user to tap on a row and navigate to a detailed view related to that row.
I found two ways of doing this that I will share with you in this post.
Example 1
Let’s start with a basic example. We will create a simple list of items where tapping on an item navigates to a detail view showing more information about that item.
struct RemoveChevronFromList: View {
    let items = ["Item 1", "Item 2", "Item 3"]

    var body: some View {
        NavigationView {
            List(items, id: \.self) { item in
                NavigationLink(destination: DetailedView(item: item)) {
                    Text(item)
                }
            }
            .navigationTitle("Items List")
        }
    }
}

struct DetailedView: View {
    let item: String

    var body: some View {
        Text("Detail view for \(item)")
            .font(.largeTitle)
            .navigationTitle(item)
    }
}In the example code above:
RemoveChevronFromList contains a NavigationView with a List of items.
Each item in the list is a NavigationLink that navigates to DetailedView when tapped.
DetailedView displays more information about the selected item.
Next we are going to customize the list rows. You can customize the appearance of the list row items by creating your own view for the row content. Add this code to your project:
struct RemoveChevronFromList: View {
    let items = ["Item 1", "Item 2", "Item 3"]

    var body: some View {
        NavigationView {
            List(items, id: \.self) { item in
                NavigationLink(destination: DetailedView(item: item)) {
                    CustomListRowItem(item: item)
                }
            }
            .navigationTitle("Items List")
        }
    }
}

struct CustomListRowItem: View {
    let item: String

    var body: some View {
        HStack {
            Image(systemName: "star.fill")
                .foregroundColor(.yellow)
            Text(item)
                .font(.headline)
        }
    }
}
In the example code above:
CustomListRowItem is a custom view that includes an image and a text label.
The RemoveChevronFromList uses CustomListRowItem to display each row in the list.
You can go crazy with this and design the CustomListRowItem however you want. Let me know if you want a move detailed example of a list row item and I can share how it looks in my new app that I am building.
Now, let’s continue and remove the chevron from that list.
By default, NavigationLink displays a chevron (disclosure indicator) on the right side of the row. To remove this chevron, we can place the NavigationLink in a background instead with an opacity of 0. This will remove the chevron. So update your RemoveChevronFromList code to this instead and run your project again.
struct RemoveChevronFromList: View {
let items = ["Item 1", "Item 2", "Item 3"]
var body: some View {
NavigationView {
List {
ForEach(items, id: \.self) { item in
CustomListRowItem(item: item)
.background(
NavigationLink("", destination: DetailedView(item: item))
.opacity(0) // Hides the link
)
}
}
.navigationTitle("Items List")
}
}
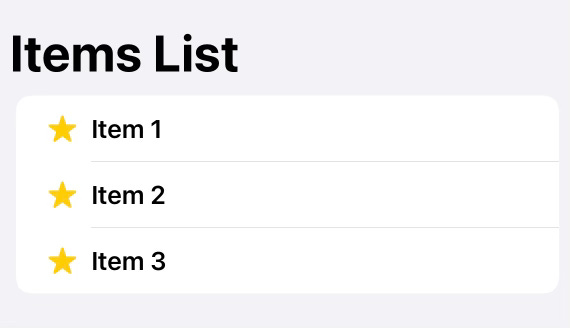
}Voila! The chevron is now gone. Result:
Example 2
Another way to remove the chevron while keeping the NavigationLink functionality is by using a ZStack to place an invisible NavigationLink behind the custom row content. This method ensures the entire row is tappable without displaying the default SwiftUI styling. So update your RemoveChevronFromList code to this instead and run your project again.
struct RemoveChevronFromList: View {
    let items = ["Item 1", "Item 2", "Item 3"]

    var body: some View {
        NavigationView {
            List {
                ForEach(items, id: \.self) { item in
                    ZStack(alignment: .leading) {
                        NavigationLink(destination: DetailedView(item: item)) {
                            EmptyView() // Invisible NavigationLink
                        }
                        .opacity(0) // Hides the link

                        CustomListRowItem(item: item)
                    }
                    .contentShape(Rectangle()) // Ensures entire row is tappable
                }
            }
            .navigationTitle("Items List")
        }
    }
}
The chevron is now gone because:
The ZStack overlays the CustomListRowItem on top of a hidden NavigationLink.
The .opacity(0) makes the NavigationLink invisible while preserving its functionality.
.contentShape(Rectangle()) ensures that tapping anywhere on the row triggers navigation.
This approach keeps your list looking clean while maintaining full row tappability.
As you may have noticed in this second example, the text is now in the middle. This is because we have wrapped our NavigationLink in a ZStack so all you have to do is this to move it to the left.
ZStack(alignment: .leading) {Result:

That was it for this time, hope you learned something new with this post.
/Mr SwiftUI